How do I do a step-by-step blood pressure check?
Enter yIn the event you get a manual or digital blood pressure monitor (sphygmomanometer), follow the instruction booklet carefully.
These steps give a summary of the way to take your own left arm blood pressure to either a manual or electronic blood pressure monitor. Only undo the sides to have a blood pressure inside your arm.
1. Locate your pulse
Find your pulse by gently pressing on your index and middle fingers slightly to the interior center of the bend of the elbow (where the brachial artery is). If you can't locate your pulse, set the head of the stethoscope (onto a guide monitor) or the arm (on an electronic monitor) at the identical general place.
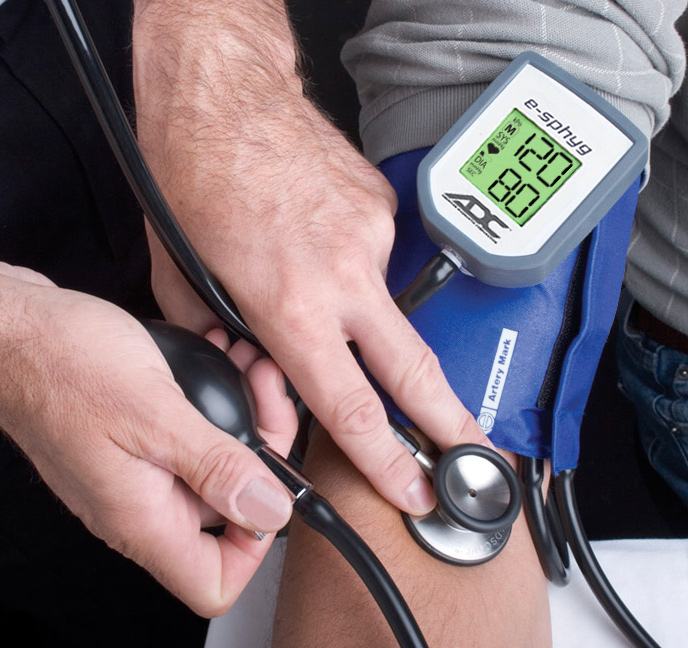
2. Secure the cuff
Twist the cuff onto your arm, making certain the stethoscope head is above the artery (when utilizing a manual monitor.) The cuff may be indicated with an arrow to reveal the location of this stethoscope head. The lower edge of the cuff must be approximately 1 inch above the bend of the elbow. Use the cloth fastener to generate the barbell comfortable, but not overly tight.
Set the stethoscope in your mind. Tilt the earpieces slightly forward to have the best sound.
3. Inflate and deflate the cuff
If You're using a manual track:
You'll find the most accurate reading when your arm is held directly.
If you published the pressure too fast or could not hear your pulse, DO NOT inflate the barbell straight away. Wait 1 minute before repeating this measurement. Begin with reapplying the cuff.
If you are using a digital monitor:
If you didn't get an accurate reading, DO NOT inflate the barbell straight away. Wait 1 minute before repeating the dimension. Begin by reapplying the cuff.

4. Record your blood pressure.
Follow your physician's directions on when and how frequently you should measure your blood pressure. Record the date, time, systolic and diastolic pressures. You should also record any particular circumstances like every recent exercise, meal, or even stressful occasion.
At least once a year, and particularly after you first purchase your blood pressure course, bring your track with you to a physician's visit to check the machine's precision. This is done by assessing a blood pressure reading in the system with one from the doctor's office machine.
- Hold the strain gauge in your left hand along with the bulb on your own right.
- Inflate the cuff by squeezing the bulb with the hand. You will hear your heartbeat in the stethoscope.
- See the gauge. Keep inflating the cuff until the indicator reads approximately 30 factors (mm Hg) over your expected systolic pressure. At this point, you should not hear your heartbeat from the stethoscope.
- Keeping your eyes on the estimate, slowly release the pressure at the cuff by opening up the airflow valve counterclockwise. The judge ought to fall only 2-3 points with each heartbeat. (You may have to practice turning the valve slowly.)
- Listen carefully to your first pulse beat. As soon as you listen to it, note that the reading on the estimate.
- Continue to slowly deflate the cuff.
- Listen carefully until the noise disappears. As soon as possible no longer hear your pulse, note the reading on the judge.
- Allow the cuff to completely deflate.
- Hold the bulb on your hand.
- Press the power button. This indicates that the track is ready.
- Inflate the cuff by squeezing the bulb with the right hand. When you have a monitor with automatic cuff inflation, press the button.
- See the estimate. Keep inflating the cuff until the gauge reads approximately 30 factors (mm Hg) above your expected systolic pressure.
- Sit quietly and watch the track. Stress readings will be shown on the monitor. For many devices, values can show up on the left, and then on the right side.
- Wait around for a very long beep. This means that the dimension is full. Note the stresses on the screen. Your pulse rate might also be displayed between or following this reading.
- Allow the cuff to deflate.
- our text here...